
Puzzles, puzzles, puzzles!
I love taking things apart, playing around with what’s inside of them, and figuring out how it works. It’s like working on a giant puzzle, where you only know bits and pieces of the final picture based on how the assembled object behaves, and you have to fill in the missing parts based on deduction. Although my expertise in reverse engineering lies mainly in computer science, I think my love of the craft extends universally.
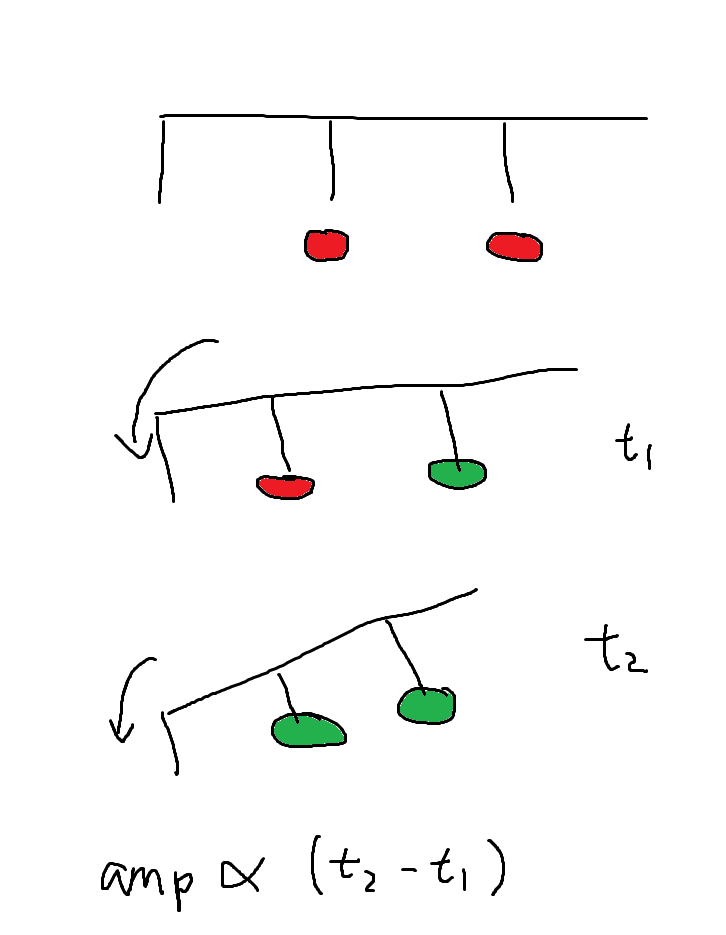
Just last summer, I was taking apart my electric piano to restore color to its yellowed keys, and in doing so, I gained a pretty good understanding of how it worked. The piano could play notes softer or louder based on how hard I struck the key, and I’d wondered what the physical mechanism behind that was. Turns out, it was incredibly simple! Underneath the key, there were two ridges placed at difference offsets from the fulcrum with heights such that one ridge would strike a button before the next. These signals are sent to a controller that calculates the delta between the signal timings to calculate an amplitude, which is then sent to an audio interface.
Well, presumably. It’s not like I pulled the machine code out of the controller and analyzed its disassembly. That might’ve been possible, but seeing the ridges and buttons underneath each key gave me enough confidence in my hypothesis.
Anyway, I’m not actually here to talk about the mechanisms of an electric piano. I want to talk about my last month and a half disassembling a binary for an old game I used to play: Wings Of Vi. I’ll be talking about… well, a lot. I learned a lot. Methods to reliably find important addresses, how Windows loads and allocates memory in its virtual address space, assembly, function hooking, disassembling and decompiling, etc.
My background in binary analysis had been pretty limited before this. The reverse engineering I’d done in the past involved looking at C# IL (intermediate language), minified JavaScript, or sometimes even code that other people had already reversed to a high-level language like C++. All of these were relatively easy to read and reason about. Reading disassembly is a huge step from that. But first, let’s go back to the start of my project.
I’d like to say I had a concrete goal at the beginning like creating a cheat interface or a modding API for the game or something like that, but I really didn’t. At the very least, my goals fluctuated throughout the project.
Reversing Addresses
I began with a mini-goal to give myself infinite health. I launched Wings Of Vi, attached CE (Cheat Engine) to it, and started looking for my health address. This is done by:
- Getting a snapshot of the game’s memory. This snapshot must contain the character’s health.
- Changing my health by taking damage, healing, etc.
- Filter the snapshot of memory to increase/decrease/not change based on step 2. This snapshot also must contain the character’s health.
- Repeat from step 2 until there are few enough memory addresses. These memory addresses are candidates for my health address.
I had a ton of trouble with this in practice. See, those steps assume that the memory address for your health doesn’t change throughout the iterative procedure. After all, if your health address changes from 0x12345 to 0x23456 during this, CE has no idea and is going to continue comparisons at 0x12345. The problem was that enemies hit too hard and there was so little healing that I couldn’t stay alive long enough. Once I respawned, I couldn’t be confident that my health address was still in the same place. How can we find the health address then?
To answer this, we need to talk briefly about how things are actually stored in memory. As a programmer, I may define a struct like
struct Entity {
  int x;
  int y;
  int health;
}
When an Entity is instantiated, a region of contiguous memory is allocated to it, say at address 0x800. The x value is offset 0 from that address because it’s the first value in the struct. Then, since ints are 4-bytes long (yeah, this is technically decided by the compiler, but 4-byte ints are pretty typical), the y value is going to by at offset 4 from that address. Lastly, the health value is going to be at offset 8 from that address.
Okay, so how does that help us find the health address? Well, we can hypothesize that the programmer might’ve defined the player entity in a similar way, meaning that the x and y coordinates of the player entity are close to the health address. If we can find the x or y coordinate of the player entity, we might be able to find the health address nearby, and the coordinates of the player entity are a lot easier to manipulate than the health!
Aside: Finding coordinates
Doing this can still be a little bit tricky in practice though, and I want to give a few quick tips.
See, if you’re playing a 2D game, the y coordinate may increase as the player entity goes down because that coordinate system is often easier for computers to understand. This means you have to make some assumptions on the coordinate system if you’re trying to get the y coordinate. However, it’s almost always the case (from my experience) that x coordinates increase as the player goes right. For that reason, I recommend trying to find the x coordinate (which will often lead you to the y coordinate) for 2D games.
For 3D games, I recommend the opposite. For convention, I’ll refer to the y coordinate to define the up and down of an object while the x and z coordinates define the planar position (the plane parallel to the ground). I’ve found that the y coordinate tends to increase as the player entity moves up in 3D games while x and z coordinates… well, there are too many degrees of freedom to begin making solid hypotheses. You can’t even figure out what directions are aligned with the planar axes most of the time, much less make any deductions on which direction increases the x or z coordinate.
Since Wings Of Vi is a 2D platformer, I did a little dance left and right and eventually found my x coordinate. Browsing the memory region where the x coordinate lived on CE while moving around and taking damage, sure enough, my y coordinate and health were pretty close. They were less close than expected though. All of these values were defined as doubles, which took 8 bytes, but the values were spaced out 16 bytes instead, meaning there were an unknown 8 bytes in between each value. It was a bit odd and I took note of this, but didn’t think too much of it at the time (though I now understand why this is the case).
Static addresses and multi-level pointers
I “locked” my health with CE (really, it’s just CE rewriting the value over and over again really fast) and tried taking some damage. Nice! I wasn’t taking any damage. I’d already confirmed that my health address changes every time I respawn, meaning that I’d have to go through this whole ordeal every time to become invincible. Or do I?
Let’s talk theory again. The addresses for player entity values does change on respawn, but the game clearly knows where these values live. This means the address for the player entity values itself has to be stored somewhere. Does that mean we should search in memory for the health address? Not quite. See, x86 (and probably other instruction sets) allow instructions to write at a memory address plus an offset. In the Entity example above, where the start of the struct is stored at 0x800, the instruction to set the entity health to 50 might look something like mov [0x800+8], 50 rather than mov [0x808], 50. Furthermore, the 0x808 address for health is likely never stored anywhere and only stores the 0x800 address for the start of the Entity. If you think about it, this makes a lot of sense. The game knows that the Entity struct is at 0x800 and the health is at offset 8 from it. The game doesn’t need to remember the health address, only where the start of the Entity is, and that the health address is 8 bytes away from it.
So, the idea is that we identify where our Entity struct starts and where the address to the Entity struct is stored, and hopefully this address holds the Entity address even after respawning. What if it doesn’t though? It could be that the player entity address is stored in a dynamically allocated array that’s reallocated on respawn. Okay, well something must hold the address to that array. We keep going up these level of pointers until we hopefully find a static address.
Static addresses are exactly like they sound: static. Well, up to a certain point. Windows loads modules like an executable file or DLL by giving them a memory region for their data and code. Let’s say I have a program MyApp.exe that loads the User32.dll file to draw a window. When MyApp.exe is run, Windows will allocate a certain region of memory for it in the virtual address space, usually specified by a field in the PE (portable executable) headers of the executable. Then, it’ll load the User32.dll module in another region of memory. Static addresses refer to a fixed offset from the start address of a module, usually located in the .data section of the code. Often, this also translates to a completely static address because modules are loaded in the same way, but we shouldn’t rely on that. Fortunately, we don’t have to because the Windows API provides a function to get the start address of a module.
This gives us a plan: follow the pointers and offset all the way up until we find a static address. Doing so will allow us to get the address of what we want through respawns and even through closing and reopening the game. Let’s take an example before we continue.
- I find my health address at 0x140008.
- I find instructions that access this address with
cmp [eax+8], 0whereeaxis 0x140000. I conclude there is a struct at address 0x140000. - I find that address 0x78100 holds the value 0x140000.
- I find instructions that access address 0x78100 with
mov eax, [ebx+0x100]whereebxis 0x78000. I conclude there is a struct at 0x78000. - I find that the static address 0x45500 holds the value 0x78000 and that 0x45500 is 0x5500 bytes away from the base address of the module.
Then, we can find the health address by “undoing” the pointer chain we found. Here’s some C-style pseudocode to illustrate:
char* baseAddr    = GetModuleBase();
char* firstLevel  = *(char**)(baseAddr + 0x5500);  // dereference 0x45500, get 0x78000
char* secondLevel = *(char**)(firstLevel + 0x100); // dereference 0x78100, get 0x140000
int   health      = *(int*)(secondLevel + 0x8);    // dereference 0x140008, get health
Putting this in practice, CE gives us a wonderful utility to see what instructions access a memory address, allowing us to figure out the offset, and CE lets us find exact values to see where addresses are being stored. It also highlights static addresses in green for us so we know when we’re at the end.
Some tips around getting these multi-level pointers:
- Write the addresses and offsets down in the form of
addr2 + offset2 = &addr1. Seriously, it helps. - The offsets given by the assembly instructions may be different for different instructions:
- For example, one instruction might be
mov [eax+0x14], ebxand another may bemov [eax+0x38], ecx. Note this and choose one offset to branch into. If it doesn’t work, come back and branch the other ways.
- For example, one instruction might be
- The offset given by the assembly instructions may be stored within a register:
- For example,
mov [eax+ebx], ecx. CE will tell you what was stored ateaxandebxon the first time the instruction was detected. The smaller number ofeaxandebxwill be the offset and the larger one will be the memory address. Usually, the first operand of the+is the memory address. - To be sure, break on the instruction when the memory address is hit and confirm that the offset is always the same.
- For example,
- You may find multiple addresses that hold the address you want.
- Try moving around, closing/opening menus, etc. to potentially filter out bad results and scan again.
- Otherwise, note this and continue branching one way. If it doesn’t work, come back and branch the other ways.
In reality, CE actually has this “pointermap” and “pointerscan” thing that’s supposed to help in this otherwise tedious process, but I haven’t really figured out how to use it. If this is something I’m going to do often, I’d probably look into that.
DLL injection
CE has built-in functionality to deal with these multi-level pointers so we can save the multi-level pointer to our health address and recover it upon closing/reopening the game/CE. This is kind of lame though: I want to be able to press a button to give myself +100 health. We can do this by creating an external or internal hack. An external hack is a program that uses the Windows API to read/write memory of another process. Comparatively, internal hacks run in the same process as the game and directly access the process memory. The advantage of internal hacks is that memory read/writes are a lot faster and hooking is a lot easier. I think a disadvantage of internal hacks is that games with anti-cheat can easily detect internal hacks. I haven’t written any hacks for games with anti-cheats yet, so I’m not sure. Either way, let’s talk about how to create an internal hack.
The idea behind the internal hack I’m about to discuss is that, we make the game process call a function to load our code in another thread by loading a library — our DLL. Our DLL runs on its own thread and does whatever it wants to the game. This method is called DLL injection. The Windows API exposes the two important functions:
CreateRemoteThread— Creates a thread that runs in the virtual address space of another process.LoadLibrary— Loads the specified module into the address space of the calling process. The specified module may cause other modules to be loaded.
All we have to do is make CreateRemoteThread call LoadLibrary within the remote process and load our DLL. There’s a little bit of complication in that LoadLibrary needs to accept the path to our DLL as an argument, and we can’t just use a string that’s allocated in the program we’re injecting from because LoadLibrary only has access to the remote process’ memory space. A call to VirtualAllocEx to allocate some memory in the remote process and WriteProcessMemory to write our string to that remote process’ memory makes it work though. Altogether, our injector might look something like:
char* dll = "path\\to\\dll.dll";
unsigned length = strlen(dll) + 1;

// find process
DWORD procId = GetProcId("Game.exe");
HANDLE hProc = OpenProcess(PROCESS_ALL_ACCESS, 0, procId);

// write the argument to pass to LoadLibrary in remote process memory
void* remoteStr = VirtualAllocEx(hProc, 0, length, MEM_COMMIT | MEM_RESERVE, PAGE_READWRITE);
WriteProcessMemory(hProc, remoteStr, length, 0);

HANDLE hThread = CreateRemoteThread(hProc, 0, 0, (LPTHREAD_START_ROUTINE)LoadLibraryA, remoteStr, 0, 0);
CloseHandle(hThread);
CloseHandle(hProc);
I don’t actually use this because CE has a DLL injector built in, but I think it’s important to understand how it works. I’m pretty sure it’s more advanced than what I wrote, but it should follow the same idea: call LoadLibrary within the remote process.
From within the DLL, we’d create a thread to run on, likely an AllocConsole in case we need to print any debug information, and likely some GetAsyncKeyState calls to respond to the keyboard. Then, we can use the code above to unravel the multi-level pointers to read/write whatever we want.
All of this can probably get you decently far in modifying the game at runtime, but I wanted to really dig in deep. I wanted to figure out how the main game loop worked. I wanted to know what entities existed, where in memory they live, and how they run. To do this, we need a decompiler.
Decompilation
The only decompilation options I know of are IDA and Ghidra. IDA is a proprietary software made by HexRays and it comes in a free and a pro version, and some others. The free version is apparently lacking in tons of important features but the pro version costs literally thousands of dollars, which is way too expensive for a hobbyist like me. Ghidra is an open source decompiler created by the NSA. It’s apparently nowhere near as polished as IDA Pro though. I did try IDA Free for a little while, but honestly, I just didn’t know how to use it well and I was somewhat discouraged to learn because I knew I was missing important features and tutorials were usually made in IDA Pro. So I switched to Ghidra, and despite people’s criticisms, I found it incredibly easy to pick up.
To get started, I decided to break on the instructions that wrote my coordinates in CE and follow the stack traces up until I could no longer step out of the stack because I was in a while loop. With the Ghidra decompilation on the side, I began to figure out the code by making hypotheses from more readable Ghidra decompilation output, test them in the game with CE and repeat. Ghidra’s auto-struct function, re-labelling, and re-typing started making the code more and more readable. Over the course of the next couple of weeks, I would read the disassembly/decompilation and figure out much of the code.
Some of the tools that were incredibly helpful during this time were CE’s structure dissector and a tool called ReClass to let me reverse structs. It would attach into the game and you could enter in memory addresses and give addresses types like declaring that offset 0x4 from an address is a short, or offsets 0x20 to 0x40 contained a string. Importantly, it let me visually see the data in multiple forms and made guesses to what type it thought an address was which might’ve been difficult in static analysis.
Seeing how long this post is getting, I’m deciding to dedicate another post to purely my decompilation findings. Stay tuned for the next post. It’ll be packed to the brim with how the game is implemented.
Low-level Function Hooking
A naive approach
Another tool I picked up during this time was function hooking. This tool extends far beyond just helping me figure out the code, so I’m going to spend a bit of time talking about it. You’ve probably at least heard of function hooking and have some idea of it might be: we “hook” onto a function A by executing our own function B whenever function A runs. This is the high level idea. This is really not too difficult to do in higher level languages: you’d probably just write a line at the start of the target function that calls your function:
void Target(int a) {
  MyFunc(a);
  // original function
}
When you’re working with bytecode, you can’t just do this though. Let’s think this through on a x86 32-bit (this is what I was working with, but obviously everything translates pretty easily into 64-bit). Suppose we’ve created a valid assembly function within the process’ memory at address 0x12345. The start of the target function looks like this:
1: push ebp
2: mov ebp, esp
3: mov eax, dword ptr [ebp+0x8]
4: cmp word ptr [eax+0x10], 0x18
5: ...
We can’t just insert before the first line of the function to call 0x12345 or jmp 0x12345! We’d have to shift the entire rest of the code below this function down! As if that wasn’t impractical enough, certain jmp instructions may rely on some code being at a certain offset, which a shift like this would completely destroy.
Okay, let’s be a little smarter. How about we just overwrite the first instruction to jump to our code? So something like:
1: jmp 0x12345
2: mov ebp, esp
3: mov eax, dword ptr [ebp+0x8]
4: cmp word ptr [eax+0x10], 0x18
5: ...
There are multiple major problems with this. Firstly, x86 assembly instructions are variable length. A push ebp instruction is only 1 byte long while the jmp 0x12345 is at least 5 bytes long. I’ll annotate the instruction lengths to demonstrate:
1: push ebp                       // 1 byte
2: mov ebp, esp                   // 2 bytes
3: mov eax, dword ptr [ebp+0x8]   // 3 bytes
4: cmp word ptr [eax+0x10], 0x18  // 5 bytes
5: ...
Let’s fix that first by writing exactly 5 bytes for the jmp instruction.
1: jmp 0x12345
2: or byte ptr [esi-0x7d], ah
3: js 0x1a
4: ...
Wait, what happened? Well, we can’t write only 5 bytes! By writing exactly 5 bytes, we mangled the 3rd instruction! We have to write at least 5 bytes, plus however more bytes aligns us to the next instruction. Fortunately, a nop (no-operation) instruction is 1 byte, so we can use it as padding. If we write the 6 bytes correctly, we should get:
1: jmp 0x12345                    // 5 bytes
2: nop                            // 1 byte
4: cmp word ptr [eax+0x10], 0x18  // 5 bytes
5: ...
Alright, but this still has one minor problem and one major problem. The minor problem is that we have to make sure that we jump back to the correct address after executing our function. Suppose we do that. Then, the major problem is that the stack is usually very delicately and meticulously handled by the compiler and the instructions we overwrote modify the stack. If we naively just ran our function we’d destroy certain stack invariants and crash the process almost immediately. Trust me, I know from experience. So before we transfer control back to the target function, we have to be absolutely sure that the stack is in the condition it would’ve been in if we didn’t have this jmp instruction. The easiest way to do that is (assuming the stack is as the same as when we initially jumped to our code) to execute the overwritten instructions.
How do we actually write code for our function though? Sure, we can write raw assembly and make our program jump to that raw assembly, and the MSVC compiler even supports pretty decent inline assembly:
void __declspec(naked) FakeFunction() {
  __asm {
    mov eax, [ebx]
    cmp eax, 1
    // ...
    // run the original instructions
    jmp 0x98789 // jump back to where we came from
  }
}
Refinement
This kind of sucks though. It’s super hard to get anything meaningful done with pure assembly. Not only that, it’s still easy to just mess up the stack! If we call a normal, non-naked function, chances are, we’re going to ruin the stack. After a bit of research and seeing how the MS Detours library does it, this is what I came up with:
0x10: call TargetFunction
0x15: mov [eax], ebx

// Get the function signature through Ghidra decompilation. Usually reliable enough
// int __cdecl TargetFunction(int, int)
0x50: jmp 0x12345 // we wrote this. jumps to code we wrote
0x55: nop
0x56: cmp word ptr [eax+0x10], 0x18
...
0x99: ret

// below is our code

// match the original function signature
typedef int(__cdecl* TargetFunctionT)(int, int);

TargetFunctionT RealFunction = 0x12349;

// match it here too
int __cdecl FakeFunction(int a, int b) {
  printf("hooked before. args are %d, %d\n", a, b);
  int ret = RealFunction(a, b);
  printf("hooked after. args are %d, %d\n", a, b);
  return ret;
}

// "trampoline"
0x12345: jmp &FakeFunction
0x12349: push ebp
0x1234A: mov ebp, esp
0x1234D: jmp 0x56        // go back to where we came from
Wait, it might be better if I explained with a picture.

… don’t look at me like that.
Seriously, I do think this visualisation makes a good trade-off between showing what’s actually happening and minimizing the complexity. I’ve simplified the jmp and calls to be the near variants for illustration, but this is actually what’s happening.
The idea is that we “hijack” the target function by jumping to our function immediately through a “trampoline”. The function we jump to immediately must match the target function’s calling convention exactly, including the calling convention so we don’t mess the stack up. The rest of the trampoline is dedicated to pretending to be the real function. If you follow address 0x12349 through, you’d be running the exact same code as the original target function. That’s what’s stored into RealFunction.
Decoration: Injecting arguments to hook
In the codebase I was reversing, there are many instances where a function is called through a jump table. I don’t actually know if this is a widely accepted term for what I’m going to describe, but it makes sense to me so I’m rolling with it. What often happens is that a “type” is specified in the first few bytes of a struct. This “type” is used to index into an array of function pointers located at a static address, and the appropriate function is called using the type. Naturally, each of these functions has the exact same function signature. I want to hook onto each of these functions. Sure, I could write FakeFunction1, FakeFunction2, etc., but I’d ideally like to have a single FakeFunction that handles all of these functions and calls the original function. How would FakeFunction know which one to call though? In some cases, the struct pointer with the type was passed into the function, so I could use the type and figure it out, but I didn’t want to rely on that in cases where I couldn’t do that.
So the goal is to inject an extra argument for our FakeFunction to receive. This is actually super hard in practice and I haven’t pulled it off, but in theory, you’d obviously need to add another argument to your function signature, and then you’d have to do something like this at the start of the trampoline (assuming a __cdecl call with originally 1 argument):
push esp            // in case we mess up
push eax            // save eax on the stack so we can use it worry-free.
mov ebx, [esp+0x8]  // this will be the first argument to the function (32-bit stack entries)
push something      // this is the argument that will be injected. second argument
push ebx            // add the original argument. first argument
call FakeFunction
add esp,0x8         // get rid of the two arguments we used
pop eax             // restore eax
pop esp             // restore esp just in case
...                 // run original code here
jmp returnAddr      // go back to where we came from
The downside of this is that we’re calling our FakeFunction instead of jumping to it, meaning we can’t just skip running the target function (jumping basically completely hijacks the target function and allows us to early return). Yes, we can set up the trampoline in a way that we rearrange the stack and push an extra argument and jump to our FakeFunction, but the call to TargetFunction (and thus FakeFunction) may expect the stack pointer to be at some location, and the extra push instruction causes it to be a couple bytes higher than expected and destroys stack invariants. Of course there are still other ways to do an early return like storing a boolean that the trampoline reads when it returns from the call, but this is already getting out of hand.
Not only that, but handling different function signatures is a huge pain. I don’t know if that code works in the first place, but it definitely wouldn’t work if the target function had 2 arguments, or 3 arguments, or anything other than 1!
Ultimately, the best solution I came up with was to:
- Create a global variable
int extra; - Create N trampolines, one for each function in the jump table
- Each trampoline would additionally set the global variable to a key (this key can even be dynamic, but that’s not useful for our purposes)
- For example, the first trampoline would set the global variable to 1
- The second would set the global variable to 2
- etc.
- Save a list of where the real functions can be found
- Use the global variable and get the key to index into the list of real functions when
FakeFunctionis called so it can call the real function
This actually works really well. I created a mini-framework for this, and it’s been holding up.
Mid-function hooking?
Aside from this, I’ve also messed around with mid-function hooking, but this is generally really difficult to get right and not even that useful most of the time. I originally wrote a hooking library tailored to mid-function hooking while still allowing start-of-function hooking because I thought it’d be cool, but I just didn’t find myself using the mid-function hooking functionality that often. If you want to do something like skipping an instruction mid-function or saving a variable to a global list you manage, you don’t get much privileges of being able to write high-level code because you risk mangling the stack — and even register values (although this can usually be made a bit safer with pushad and popad and pushing/popping FP registers before and after transferring control flow, respectively). Most of the time, start-of-function hooking is just good enough.
Conclusion
Well, I don’t know what to put here. I don’t really have a conclusion since this post was just an assortment of learnings I’ve had over the past month and a half. I’ve had a ton of fun with playing around with this stuff at such a low level. This knowledge unlocks so many options and I’m excited to put it to use. If it’s not clear, I don’t condone abusing this knowledge to cheat in online games. I think the tone and content of my discussion hinted toward my technical interest rather than an interest to cheat. Cheating in singleplayer games is totally okay (and I like doing it to understand the game), but if you cheat in online games to pretend like you’re good, you’re super lame.